News:
January 14, 2017, 08:55:02 AM


ExtremeTerrain – Jeep Wrangler Parts

Author Topic: Eric's ZJ Build  (Read 16745 times)

Offline Technohead

  • Official NEJ Member
  • ******
  • Posts: 533
  • Old School
Eric's ZJ Build
« on: February 09, 2010, 07:48:39 PM »
Before getting into the nitty gritty of my current build I'll share a bit about my first build: a '72 International Scout II. My father bought it for me in '80 and over the next year we did a 4" spring lift, 3" body lift, Detroits w/ 4.10's, 33" MTs, and a 392 V8 w/ 4 bbl and headers. Wheeled it hard for 4-5 years in the 80's then had it on the road again for a couple years in the mid 90's. She's been sitting ever since. I'll never let it go. Hope to turn it into a buggy if I ever get the time. Here's a couple pics at some property owned by one of my high school buddies parents. Just a little 10 acre playground but we killed alot of vehicles in there:


And now the "abbreviated" version of my current rig's build which spans about 6 years. It’s a 1996 Grand Cherokee Laredo that I purchased in ’98 with about 33,000 miles. The vehicle was a lease that my father turned in early when Jeep came out with the 4.7 WJ. It came to me in virtually showroom condition for $22,000 with a 5.2L V8, Quadra-Trac (NP 249), Infinity sound system, and overhead console. It was my daily driver for 5 years and never really saw off-road action except for fire roads up in Northerm Maine and the sand down at East Beach:


About 6 years ago I picked up a car for daily driving and kept the Jeep for towing, camping, winter driving, and so forth. At this time the Jeep had tallied over 180k miles. The axles and transmission were showing their age so I had the axles rebuilt to stock specifications (mistake!) and installed a remanufactured transmission. I was thinking about getting back into wheeling so I also got a 2" BB, Rancho shocks, and some 31" BFG AT's. Literally within weeks I decided the BB was not cutting it so in went a Rubicon Express 3.5" lift:


At this time I still was not wheeling it much because I did not know where to go except for some places up in Northerm Maine (I grew up in Maine and moved to RI back in 99).

To be contineud . . .
« Last Edit: February 14, 2010, 08:15:04 PM by Technohead »
-Eric  '96 ZJ

Offline Bradman

  • Official NEJ Member
  • ******
  • Posts: 9504
Re: Eric's ZJ Build
« Reply #1 on: February 09, 2010, 08:07:55 PM »
great start.  Welcome Eric

Offline Technohead

  • Official NEJ Member
  • ******
  • Posts: 533
  • Old School
Re: Eric's ZJ Build
« Reply #2 on: February 09, 2010, 08:23:27 PM »
About 2 years ago the viscous coupling in the t-case started binding up. I really liked the 249 and the ability to just step on the gas and go. In fact I had never even shifted it into 4-lo! In an attempt to diagnose what was going wrong with t-case I turned to the Internet. Even though I work in the software industry up to this point I had no idea that Internet forums like this existed. Really! In short order I stumbled across NAGCA and started reading. I figured out that my VC was going bad and concluded that I should swap in a 242. I scored the 242 from Jeeps Unlimited, rebuild kit from Crown, and SYE kit w/ rear driveshaft from Tom Woods. After much flailing around I had it in:


The project was supposed to end there but after seeing all the rigs on NAGCA . . . well, you know how it goes. Before I knew what happened Hanson bumpers, BFG MT's, and Pro-Comp wheels were on the way:


I really wanted to do some wheeling so back to the Internet I went. Learned about RIOHVA, joined up, and attended a campout at Stepping Stone Ranch. I was the only 4x4 there with a bunch of bikes:


Bent the steering, snapped the front driveshaft CV, and caved in the rocker panel. Solution was Currie HD steering, Cardan/double-Cardan driveshaft from Tom Woods, and sliders:


Better late than never on the sliders I guess! Only problem was I did not like losing the clearance. But I had some ideas on how to fix that . . .

-Eric  '96 ZJ

Offline Technohead

  • Official NEJ Member
  • ******
  • Posts: 533
  • Old School
Re: Eric's ZJ Build
« Reply #3 on: February 09, 2010, 08:50:49 PM »
RIOHVA seemed like a dead end for 4x4's so after a little more searching I came across Ocean State Jeepsters. I signed up for the forum, attended several events, and joined the club. Definitely a great bunch of people.

So I still had to solve the problem with sliders killing my clearance. I had a big bonus payout at the start of last year so I decided to shoot the works: new axles, lockers, and long-arm suspension.

At first I was thinking to get a pair of the new generation D44 axles from Mopar. Unfortunately, they only come with 4.10's and I wanted 4.56's. I was also skeptical about the e-lockers in comparison to the bulletproofness of Detroit's. Besides that I wanted the "pleasure" of building up my own so I scored a HPD30 from a 97 Cherokee and D44 from a 87 Cherokee:


Detroit locker for the rear axle and Tru-Trac for the front. I decided on the Tru-Trac because I still wanted to steet the rig in the snow and had horrible experience with my front locked Scout in the snow. Ideal solution would have been a selectable locker but that would have been a budget breaker:


New front axle shafts and unit bearings (not alloys but RCV shafts are on the list):


Rear disc brake kit from Teraflex:


Moser axle shafts for the rear:


Made the trip down to Waterbury, CT. Words are inferior so here's the pictures:


-Eric  '96 ZJ

Offline Technohead

  • Official NEJ Member
  • ******
  • Posts: 533
  • Old School
Re: Eric's ZJ Build
« Reply #4 on: February 09, 2010, 09:01:29 PM »
Spent most of last winter collecting the parts then once spring rolled around it was time to pull the trigger.

Stripped the axles of all brackets and internals then had them sandblasted. New brackets were sourced from Rusty's and Ballistic Fabriction. Coils are Rusty's 5.5".

Detriot Locker installed in the rear axle:


Detriot Tru-Trac installed in the front axle:


Brackets welded on (some of them are just tacked/bolted in the photos):


Completed axles ready to install:


Passed the point of no return:


Axle shafts and brakes installed:


Rear brake plumbing:


A few shots of the installed rear suspension:


Got the rear installed without much complication.
-Eric  '96 ZJ

Offline Technohead

  • Official NEJ Member
  • ******
  • Posts: 533
  • Old School
Re: Eric's ZJ Build
« Reply #5 on: February 09, 2010, 09:13:55 PM »
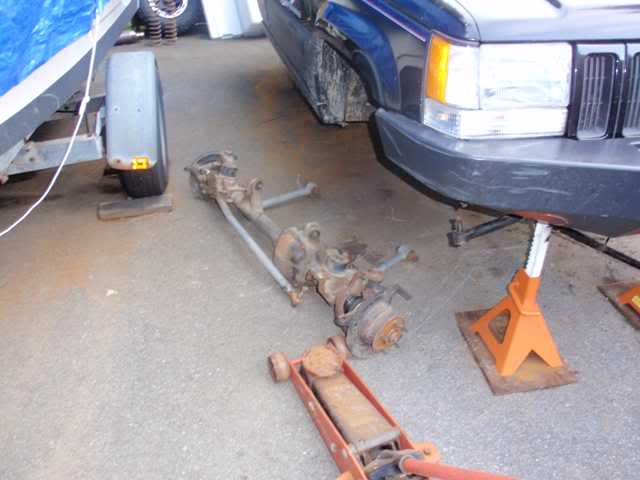
Got the front axle out no problem:


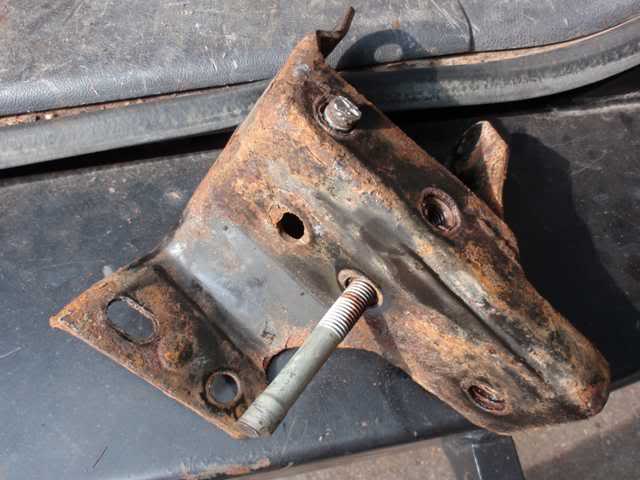
Went to remove the track bar bracket which was getting replaced with a double-shear unit and one of the bolts snapped off:


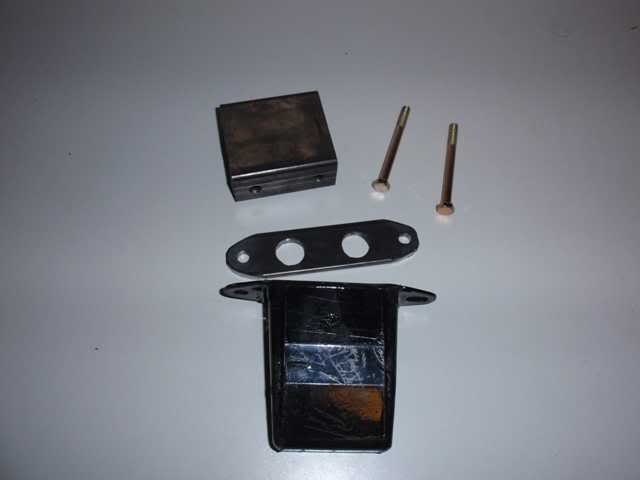
This bolt goes through to a nut that is welded to the engine mount bracket. I pulled the engine mount (what a PITA) and then proceeded to break off another one of the bolts holding on the engine mount bracket. I just love it when what should be a 10 minute bolt-on job turns into a multi-hour ordeal.

Here's that f***ing motor mount bracket that caused so much pain:


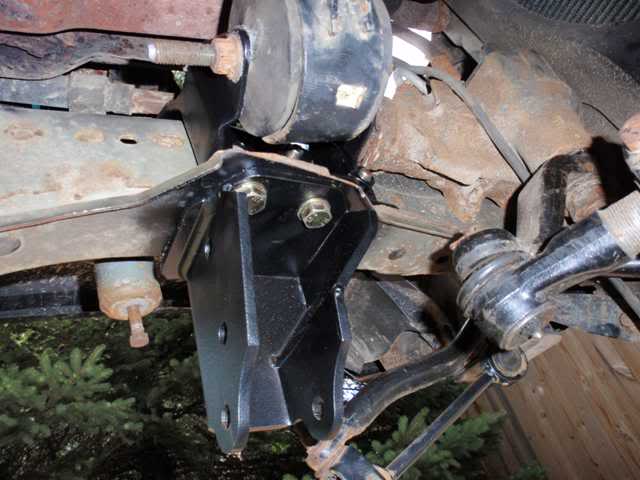
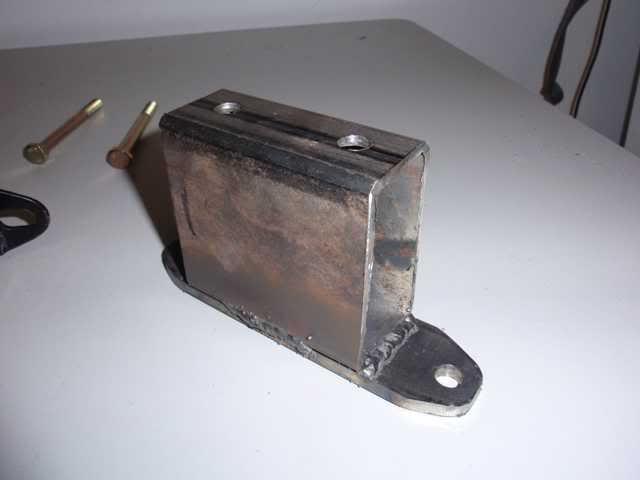
Motor mount bracket and track bar bracket bolted back on. Wasted alot of time tracking down the required metric 10.9 hardware:


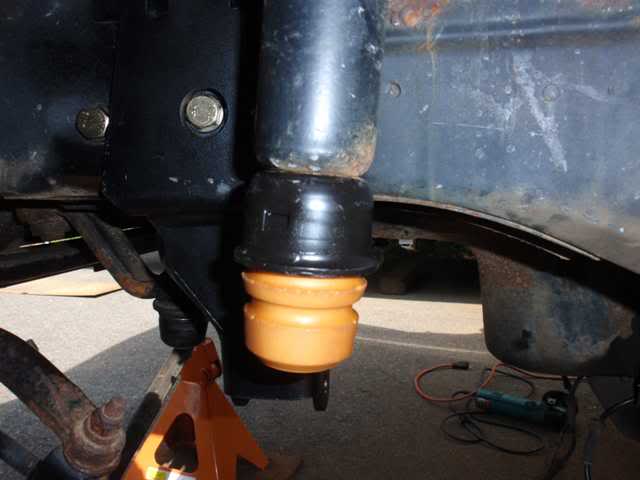
Replacement front bump stops that the stealership gouged me $90 for:


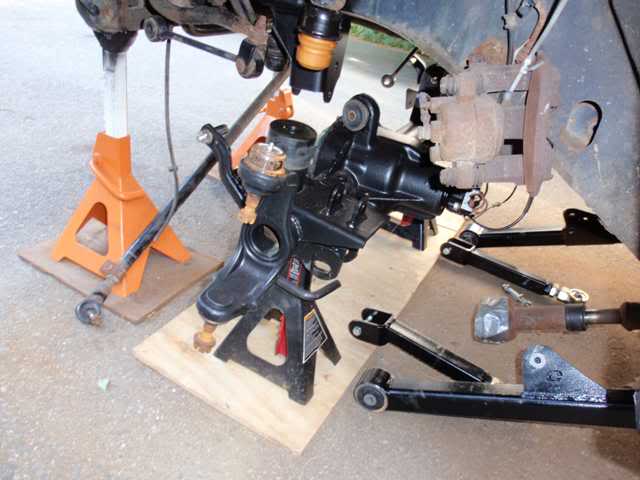
Positioning the front axle:


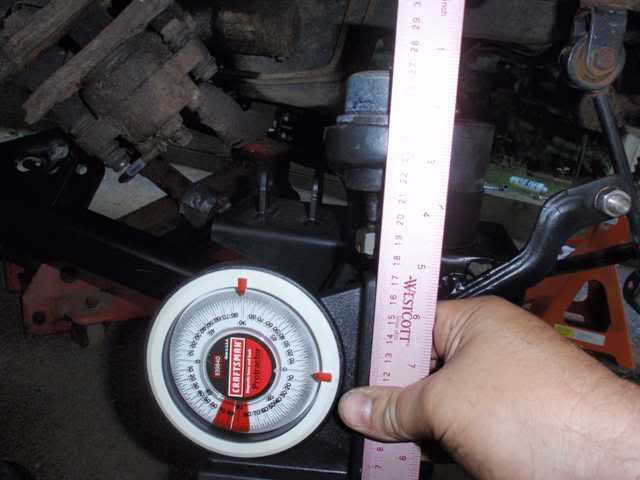
Dialing in the caster angle. Factory calls for 7 degrees positive. With the larger tires I figure anywhere from 3-7 should be OK. I can tweak it later if necessary but I really don't want to because adjusting those control arms is a PITA:


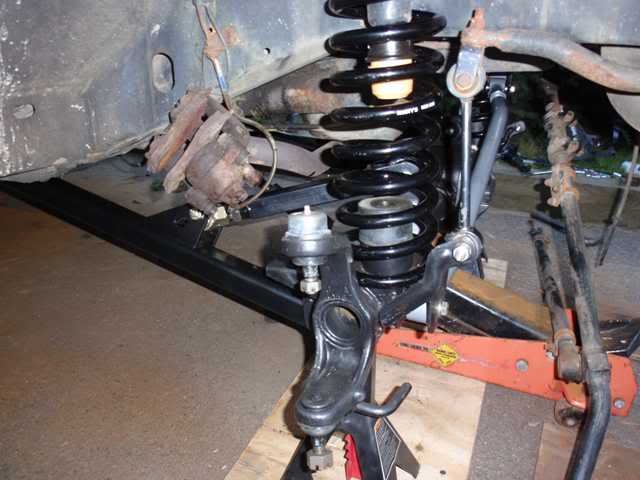
Sliding the springs into place. Dropped the axle down off the jack stands and never needed the spring compressor:


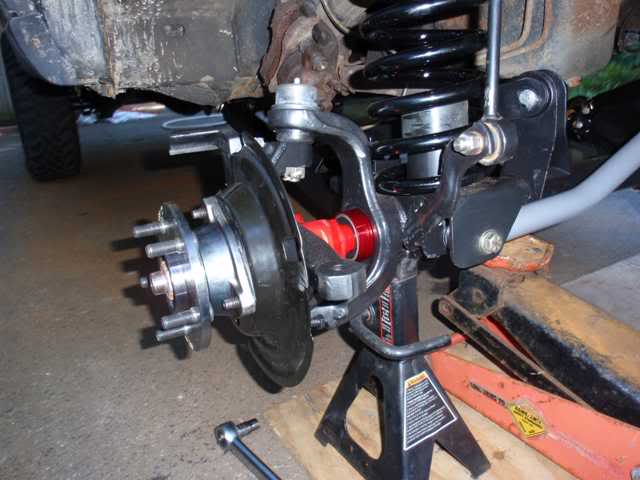
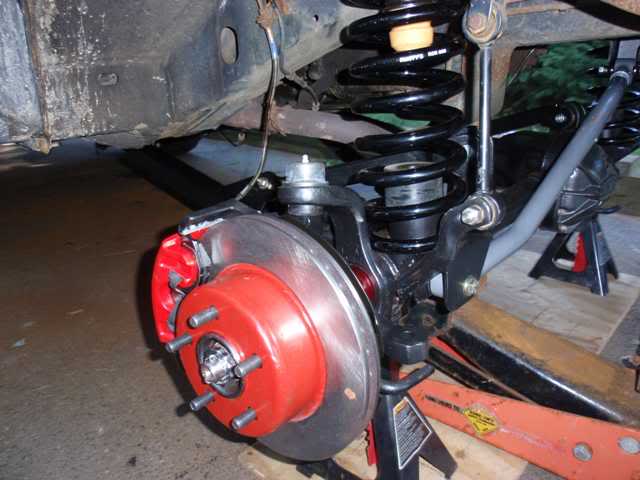
Install knuckles, outer axle seals, axle shafts, and unit bearings:


Install brakes:


Bolted up the driveshaft. The old low pinion axle used a longer pinion gear while the new high pinion axle uses a short pinion gear. I was hoping the two effects would cancel. As you can see by the bare spot on the slip yoke they did not. Driveshaft is stretched about an inch with barely a half inch of extension left. I can probably get away with it for a while but before too much longer back to RI Driveshaft I go:


Adjusting the trackbar:

[/QUOTE]

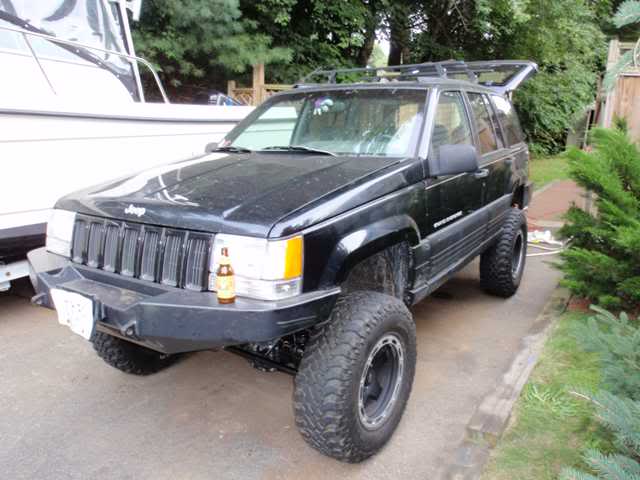
Here she is sitting on all fours again:


Some of the final details.

Built some custom rear bump stops from 3"x1.5"x0.120" rectangle tubing, bar stock, and 4" XJ "upcountry" rear bump stops:


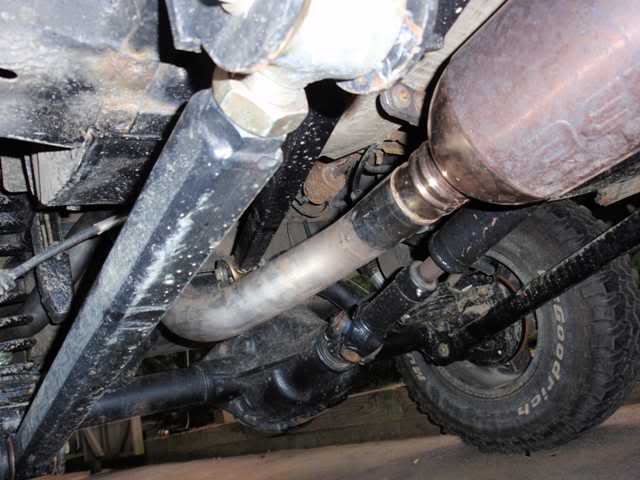
Custom stainless tailpipe and Aero muffler:


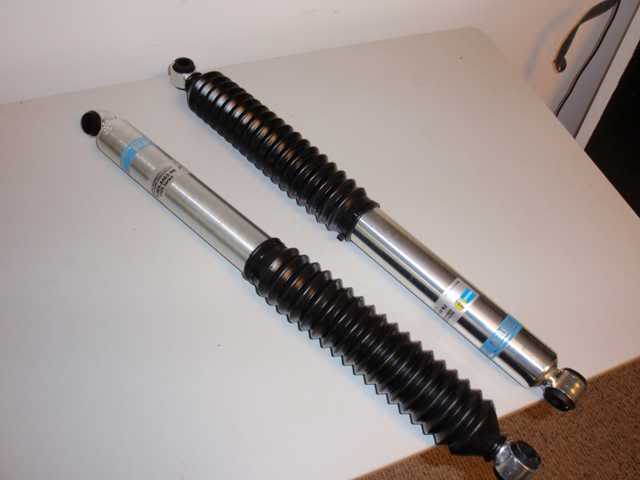
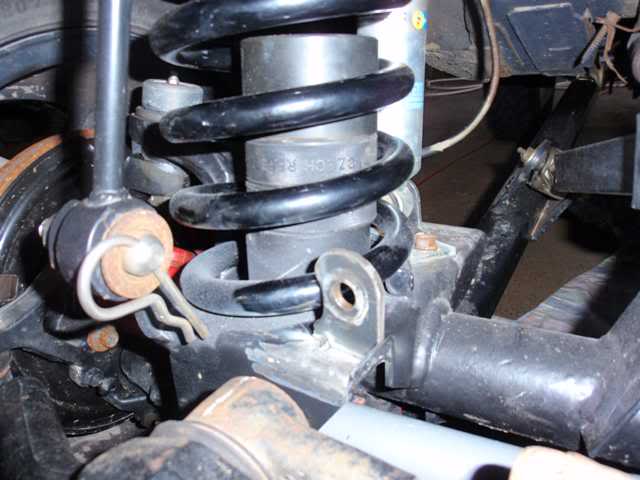
Bilstein stocks all around. The mounts were designed so the same part number fits all four corners. Had to pull the ABS pump to install the driver's side JKS stud eliminator. No more dealing with those PITA studs:


Custom made some tabs for the steering stabilizer:

-Eric  '96 ZJ

Offline Technohead

  • Official NEJ Member
  • ******
  • Posts: 533
  • Old School
Re: Eric's ZJ Build
« Reply #6 on: February 09, 2010, 09:20:20 PM »
Finished up the job just in time to make the Fall Crawl. Everything worked flawlessly except on the way up Friday night I smoked the waterpump 16 miles from the registration desk. Luckily the parts store was still open and a local garage opened up to help me fix it:


The Ocean State Jeepsters campsite:


Some pics from the trails:


Got a customized tailpipe and small dent on the door:


-Eric  '96 ZJ

Offline Twisty

  • Official NEJ Member
  • ******
  • Posts: 10636
Re: Eric's ZJ Build
« Reply #7 on: February 09, 2010, 09:27:39 PM »
I love build threads with lots of pics!
88 MJ buggy, 4.0/AW4, 203/205, 3 link front/4 link rear on airshocks, 42" Iroks, full hydro

"Only wealthy men can afford to buy cheap things."

Offline Technohead

  • Official NEJ Member
  • ******
  • Posts: 533
  • Old School
Re: Eric's ZJ Build
« Reply #8 on: February 09, 2010, 09:29:27 PM »
So that pretty much brings me up-to-date. Current WIP includes a Superwinch, TrXus tires in place of the BFG's, and t-case skid plate. I never did put the sliders back on. Instead I'm going to cut out the rockers and replace them with sliders. I'm still working out the details on the rocker replacement. Here's the t-case skid plate concept. Green is the existing structure and blue is the skid plate. Just need to finalize the dimensions then order the steel:


-Eric  '96 ZJ

Offline mika401

  • Guest
  • Posts: 2566
Re: Eric's ZJ Build
« Reply #9 on: February 09, 2010, 09:34:18 PM »
Very nice write up.
Is that how it stands today?

Offline Bradman

  • Official NEJ Member
  • ******
  • Posts: 9504
Re: Eric's ZJ Build
« Reply #10 on: February 09, 2010, 10:19:57 PM »
Very impressive.  All the right parts straight from the get go, no messing around.  8)

Offline Krome

  • Official NEJ Member
  • ******
  • Posts: 4777
Re: Eric's ZJ Build
« Reply #11 on: February 09, 2010, 10:29:23 PM »
Hot! I love your ZJ! Clayton is the way to go, loved my TJ on claytons.

Still got the old axles?  ;D

Offline Technohead

  • Official NEJ Member
  • ******
  • Posts: 533
  • Old School
Re: Eric's ZJ Build
« Reply #12 on: February 11, 2010, 02:40:32 PM »
Still got the old axles?  ;D
Sold the D30, still have the D44a minus brakes. Been posting it on CL for a little while. Lots of tire kickers but no takers. I had like $1,800 tied up in the rebuild of the rear axle which included new everything except the housing, bearing caps, and caliper brackets. Was looking to get $150 for the axle which is less than half what the axle shafts cost . . .
-Eric  '96 ZJ

Offline jps4jeep

  • Club Officer
  • *****
  • Posts: 12090
  • Average at best
Re: Eric's ZJ Build
« Reply #13 on: February 12, 2010, 08:44:58 AM »
well done
« Last Edit: February 12, 2010, 08:45:19 AM by jps4jeep »
Dad always said "If it has boobs or spark plugs it will be fun AND will cause you problems."

Offline Technohead

  • Official NEJ Member
  • ******
  • Posts: 533
  • Old School
Re: Eric's ZJ Build
« Reply #14 on: April 04, 2010, 09:21:32 PM »
Time for an update. I rode with y'all a couple weeks ago at RSG and never saw a picture thread. What's up with that?  

So here's my pictures. Its legitimate to post in my build thread because of all the carnage.

Final tally for me was 1 front axle shaft, 2 ball joints, rear passenger door caved in, peeled the drivers side front fender, cleaned out marker lamps and header panel, and cracked the windshield. My friend Bill (also from OSJ) snapped his rear driveshaft and cracked his windshield. I still can't believe we were able to pound the ball joints back in an get out of the woods. Thanks to everybody that helped; especially Tony (?).

Everything started out innocently enough:


Oops, whats wrong with this picture:


Not good:


Bill's driveshaft:


Ran into a wall of sand trying to get out in 2WD:


The video:

www.youtube.com/watch?v=8ukD5OZMf3E

www.youtube.com/watch?v=bxXm3XkKP5U

www.youtube.com/watch?v=yrGQkPu28_A

www.youtube.com/watch?v=WlUM2et5Chs

www.youtube.com/watch?v=UAvGR6QrdSo
« Last Edit: April 04, 2010, 09:35:34 PM by Technohead »
-Eric  '96 ZJ


Jeep Parts and Accessories


Click Here For Custom Graphics!